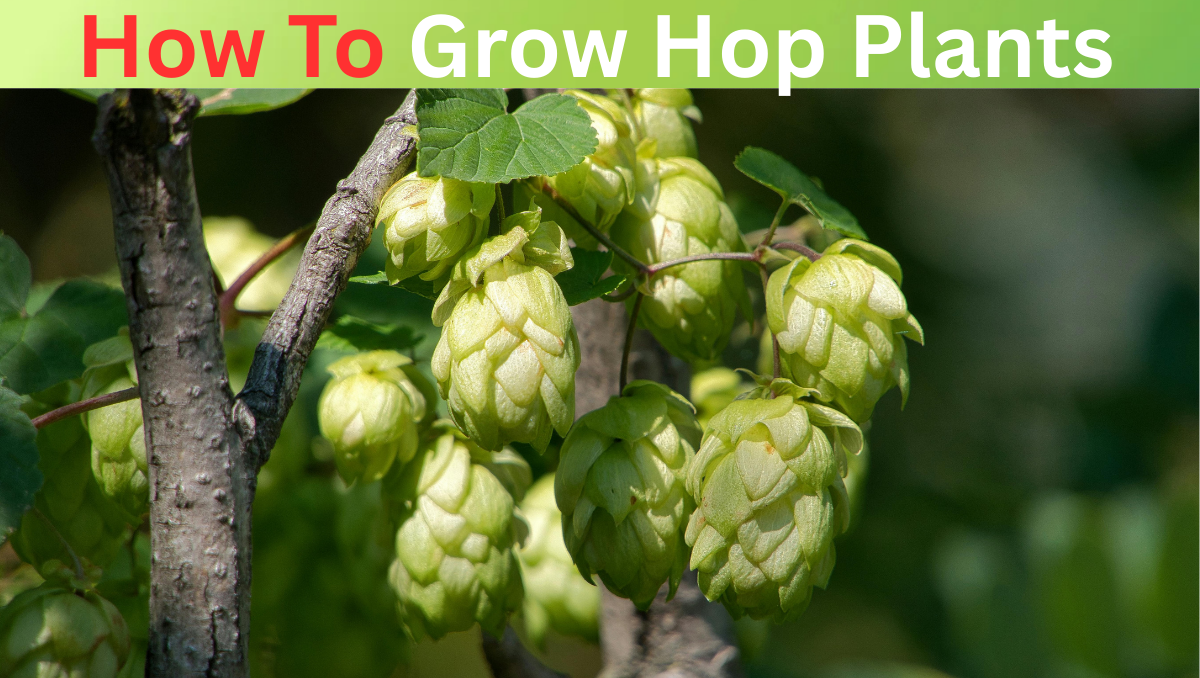
Grow Hop Plants Fast: Ultimate Guide

Most gardeners overlook that Humulus lupulus is a dioecious plant — only female plants produce strobiles used in brewing. Truly understanding this perennial plant’s biology, from rhizomes to crown, shapes every key decision in successful cultivation. Before selecting a variety, consider your growing region, soil type, and full sun availability. Hop production demands patience — first year bines rarely impress, but by year three, vigorous growth and flavor complexity become genuinely remarkable. What Are Hop Plants? Humulus lupulus, a perennial plant from the Cannabaceae family, grows as bines across North America and western Asia. These vigorous growing climbers naturally produce seedless cones long used in beer and alternative medicine for decades. The female plant develops papery hop bines that reach 20 feet, thriving well in USDA zones 3 to 8. Each crown survives frost at -20°C, storing energy underground and fueling reliable harvests through early September. Also Read: How to Grow Plants Indoor Hop Varieties Cascade, Centennial, and Saaz remain essential picks among homebrewers worldwide. Aromatic varieties such as Willamette and Mt. Hood balance bittering with rich aroma, while Chinook and Nugget consistently thrive across craft breweries and home gardens. Dwarf variety options suit small footprint gardens well. Mildew-resistant and disease-resistant cultivars like the American Cluster variety deliver high productivity when started from same-cultivar hop rhizomes sourced reliably from a reputable supplier across different varieties. Location / Where to Grow Growing hops demands full sunlight — at least six to eight hours daily. Regions like the Pacific Northwest, Oregon, Vermont, and New York offer mild summers and cool winters that naturally support a long growing season. Vines require substantial vertical space, ideally near a sturdy trellis system or wooden beams. A well-drained, loamy site with reliable irrigation system access keeps roots sufficiently moist without creating swampy conditions that harm plant vigor. Soil Preparation Loose soil ensures roots spread freely—something commercial growers rarely discuss. Work in well-rotted organic matter, compost, and manure before planting. Adequate drainage prevents waterlogging, while balanced nitrogen, phosphorus, and potassium levels prime the ground. A narrow trench dug into well-drained soil with pH around seven creates ideal conditions. I add one inch compost annually. Sandy bases need extra organic matter to retain soil moisture and support root system development. Planting Rhizomes planted carefully in early spring thrive best in well-draining soil enriched with organic matter. Space them 5 feet apart, 1 foot deep, beneath a sunny spot that receives at least 12 hours of daylight. Place each rhizome horizontally with buds facing up, then carefully cover with compost and a thick mulch layer. This supports root growth while nutrients from well-rotted manure fuel the season’s top growth toward the trellis. Fertilization / Feeding Rich soil alone won’t sustain heavy bines. Spring nitrogen drives prodigious growth, while well-composted organic matter replenishes depleted ground. Many growers overlook potassium’s crucial role in alpha acid yield and cone quality during late summer. Nutrient uptake depends heavily on pH level — keep it between pH 6.0-7.5 for optimal absorption. Sandy loam feeds differently than clay; adjust your feeding schedule based on soil test results and growing season demands accordingly. Growth Training & Trellis Support Rambunctious vines need daily guidance onto trellis wire and twine. Train each shoot to climb clockwise, using tiny hairs to naturally grip. Vertical space of 20 feet keeps side arms spaced and air circulation optimal. Commercial hop yards set rows at 1.50m spacing, with 6 m tall structures overall. Vine extension reaches overhead by mid-summer. Each charismatic climber grips vertically, directing lateral growth and ensuring full productivity throughout growing vines. Watering Deep irrigation once weekly suits most hop gardens, but warm dry weather forces more frequent cycles. Watch the soil surface closely — established plants signal drought stress through wilting leaves long before crowns show underground damage. Good draining soil paired with two inches mulch regulates moisture around hop roots. Wet weather invites fungi and disease in moist zones, so ensuring drains well conditions prevents rotted crowns — something organic mulches handle effectively. Common Diseases & Pests Most growers underestimate how rapidly disease development escalates once mildew grips a dense hop canopy. Proactively selecting mildew-resistant varieties remains the smartest early defense in humid growing regions where diseases quietly devastate entire seasonal harvests. Caterpillars, butterfly larvae, and moth feeding typically cause cosmetic damage rather than critical harm. Still, disease prone plants face compounded vulnerabilities — tackling pest pressure alongside airflow improvements remains how seasoned growers effectively prevent diseases year-round. Harvesting Hops Experienced growers learn to trust the vines instinctively — true harvest readiness shows when moist inner cones compress and bracts rebound firmly. That late August window produces a harvest bounty of freshly-picked hops with brittle perfection. Testing each cone at its central stem using the fold in half method — listen for that definitive snap. Measured yield often reaches one to two pounds per bine, confirming the plant’s natural flavor stabilizer potential. Drying & Storing Hops When dried cones feel papery and snap cleanly, the oast has done its job. Lupulin glands preserve resins and oils that define your homebrew — rush this step, and you’ll sacrifice every trace of yellow powder. Sticky dried hops sealed in a plastic bag with expelled oxygen store remarkably well. A refrigerator preserves scented resins far longer; skipping this invites a rancid, pungent smell that ruins your dry hopping additions permanently. Also Read: How to Grow Tulips: Planting, Care, and Tips for Vibrant Spring Blooms Hop Vine Care Pruning lower leaves within the lowest four feet dramatically boosts light penetration and air circulation. Lateral branches left unchecked invite mildew, stunting masses of flowers. Smart hop canopy management separates mature plants from stunted ones. Two or three shoots per main stem are trained clockwise on trellis wire during budding, never left to creep. Clearing side branches protects foliage, and managing secondary shoot growth sustains robust vine performance each season. Winter Care Hardy hops enter dormancy after dying off above ground, yet the underground stem stays alive. Even at -4°F, extensive root structure … Read more

How to Grow Plants Indoor: Ultimate Easy Guide for Healthy, Lush & Thriving Plants

Houseplants redefine what a home can feel like. Managing light conditions, soil, humidity, and water transforms any indoor space, whether a compact apartment or a sprawling house, into a living, breathing sanctuary of healthy growth. I’ve grown succulents right beside tropical philodendrons and slowly learned that every plant communicates through leaves, roots, and color. Understanding photosynthesis, drainage, temperature, and nutrients builds reliable instincts — not just guesswork — about plant health year-round. Light Most beginners overlook how light shapes plant survival beyond growth. Bright indirect light suits foliage varieties well, while direct sunlight fuels flowering. Understanding native habitat helps position plants near windowsills or supplement with grow lights. Dormancy cycles show light isn’t constant—winter shortens the photoperiod, triggering rest in many species. Stomata respond to intensity, affecting transpiration and metabolism. Rotating your planter pot corrects crooked growth habit and ensures balanced development. Water / Watering Overwatering silently destroys more houseplants than neglect ever does. Root rot begins in soggy soil long before wilted leaves appear. Always check moisture first—a finger an inch deep reveals far more than any schedule. Flushing with warm water monthly clears calcium deposits and salt buildup. A saucer beneath catches excess runoff but should never hold pooled liquid—roots quietly reabsorb that trapped moisture, and the cycle invites root rot. Soil Potting soil quality determines plant success more than most realize. Well-draining soil mixed with compost and clay balances organic compounds against inorganic elements, providing roots with the right retention and aeration needed for sustained growth. Repotting into fresh potting soil mix actively prevents both fungal disease and slowed growth. Adding calcium, magnesium, and micronutrients replenishes depleted nutrition. Always sterilize old containers using bleach and soap before reuse, protecting fragile seedlings. Potting / Choosing a Container Terra cotta and plastic pots always behave differently — one governs moisture retention and aeration, the other traps warmth. Choosing wisely between them determines whether your tropical varieties, cacti, or orchids genuinely flourish long-term indoors. Drainage holes matter more than aesthetics. Pairing well-draining potting mix with the right container — sized just one pot size up — prevents fungi, mold, and pests while giving roots structured upright space to truly thrive. Fertilizer / Feeding Most gardeners underestimate how nutrients shape physiology—bloom intensity and growth consistency both depend on timely fertilizer use. During the growing season, compost and organic matter in your soil mix deliver bio-available fuel for perennials. Spring triggers a shift in plant energy—organic-based fertilizer and plant spikes feed bulbs and vegetables steadily. Scaling back during the non-growing season keeps roots healthy, allowing summer bloomers to return year-after-year with remarkable vigor. Humidity Misting creates localized air moisture that helps transpire through leaf pores, reducing leaf curl risks. Tillandsia and air plants thrive when soaking replaces standard watering, especially in kitchen or bathroom spaces with natural humidity fluctuation. Cold drafts near drafty windows consistently sabotage humidity balance, particularly harming prayer plants and Calathea significantly. A small fan promoting air movement beside pebble pots filled with water sustains localized ecosystems while deterring diseases effectively. Grooming Regular grooming keeps plants thriving by removing brown leaves, yellowing leaves, and shriveled growth that slowly drain energy. Wiping dust from well-formed leaves weekly improves air circulation while revealing hidden insect pests on older stems. Droopy or mushy stems signal neglect — grooming teaches you to observe appearance changes early on. I treat mealybugs and scale insects on sight, before damage spreads and compromises otherwise vibrant growth across your indoor garden. Pruning Most growers underestimate how timely pruning redirects energy toward buds and well-formed leaves. Cutting back elongated stems on pothos reliably prevents spindly growth; snipping just above a node encourages compact, vibrant growth in any houseplant. Rubber plants and Ficus elastica respond well to pruning during warm months, away from dormant states. Wiping cut ends with lukewarm water prevents milky sap hardening, keeping both the wound and surrounding well-anchored stems clean. Repotting Repotting demands more than just choosing a new terracotta pot — it’s a reset. Move one pot size larger, refreshing with perlite and potting soil to guarantee free draining conditions that prevent root rot and suffocation. Drainage holes matter more than container aesthetics. I always rinse new terracotta planters with distilled water to flush salts first, then layer peat, vermiculite, and cocopeat for a lightweight, breathable mix that roots genuinely love. Growing From Seed Seed germination is not passive. A seedling needs sterilized seed starting soil, not garden soil, to safely emerge. Humid conditions with steady warmth are the real triggers — not just a seed tossed into loose dirt. Seed sowing in plastic flats reduces fungus gnats compared to open trays significantly. Seedling growth accelerates when you germinate seeds with consistent temperature and record keeping — logging every date a seed begins to crack open. Choose Healthy Houseplants Selecting healthy houseplants requires examining firm stems, lush foliage, and clean roots before buying. A first-time plant parent should skip finicky species and choose forgiving, easy-to-care-for varieties that naturally thrive with minimal care at home. At the garden center, carefully inspect leaves for spider mites, yellow leaves, or sticky substances — clear early signs of infestation. A thriving, low-maintenance pick protects your indoor greenery and fills your space with genuine happiness. Complement Your Decor Houseplants radically transform home decor in ways furniture never could. Vibrant leaf hues of Chinese evergreen complement neutral walls, while Monstera’s bold green leaves elevate end tables into curated focal points of genuine lasting beauty. Variegated arrowhead vine and purple tradescantia with lance-shaped foliage build atmosphere, introducing color and texture designers charge thousands replicating. Trailing peperomia on bookshelves or a dracaena bearing spiky, strappy foliage completes indoor decor vision effortlessly. Air / Ventilation  Dry air quietly damages indoor plants before you notice it. Water vapor levels drop during winter months, causing leaf curling, yellowing, and even bud drop. Keeping the humidity range at 20-30% safeguards plant cells effectively. Grouping plants together naturally boosts local evaporation, raising surrounding air moisture levels significantly. Place a humidity tray filled with pebbles or polished … Read more

How To Grow Snake Plant At Home – The Easiest Indoor Plant Anyone Can Grow!

How To Grow Snake Plant At Home

Will You Know How To Grow Snake Plant At Home? Having a snake plant in your home should be at the top of your list. They are great for beginners because they grow well in any lighting conditions and don’t need to be watered frequently, usually two to three times a week. Grow snake plants indoors in bright, indirect light with good drainage from pots of potting mix and occasional watering only when the soil is completely dry. Low maintenance, drought tolerant and thrives in above-average temperatures. Easily propagated by leaf cuttings or by dividing the plantlets in soil or water. Here’s The Gist Of It Below is what you really need to know to maintain a healthy snake plant. Also Read: Mango Tree Care Guide: Tips for Growing Healthy Mango Trees in Your Garden Why Snake Plants are the Absolute Coolest Snake plants, often referred to as drag queens by their new genera, are widely considered to be among the best and most versatile houseplants. They are loved for their stunning, architectural sword-like foliage that fits perfectly into modern decor while offering incredible low-maintenance and health-boosting benefits. Snake Plant Varieties There are many types of snack plants, here are some of my favorite types: Black Gold Or Black Jac Black Gold and Black Jack are the most common types. When you think of snake plants, many people usually think of the types that wilt with a yellow flush on the outer edges of the leaves. Black Robusta Or Futura Robusta The Black Robe Star and Phytora Robe Star are a type of dark green snack plant with light stripes running horizontally through the leaves. Golden Hahnii Four bird’s nest sizes are a different type of family of succulent plants where the small leaves bend back and take the shape of a bird’s nest, which is why it is also called bird’s nest size. Cylindrica Plants Cylindrica snake plants are very cold hardy, the leaves are thick, round and very strong with a hard skin, and they themselves come in a few different varieties. Anatomy of a Snake Plant Snake plants are known for their long blade-shaped leaves. The green color on them is usually muted and when they are healthy they stand upright in the air. They always remind me of Honeysuckle the Kid because they look like large blades of grass. The roots of snake plants are called rhizomes. This means that there can be several root systems at once. They are easy to divide and will spread when planted outdoors. The roots are very shallow, especially considering how tall the plant can get. Also Read: How To Grow Hop Plants – Why Hop Plant Can’t Grow! Soil For Your Snake Plant They don’t worry too much about what kind of soil you use. You don’t need to plant them in indoor potting mix or soil. In fact, you can probably grow whatever you have outside and it will be fine. However, I like to mix half garden soil and half potting soil with rocks to create a great natural drainage system for the plant and it is extremely beneficial for the plant. Sunlight For Your Snake Plant Snake plant is a very low maintenance houseplant. It is a drought tolerant plant like crickets and watering is infrequent and only when the top two inches of soil are bone dry. Can you water it again? I check every two weeks. Water with a room temperature water to avoid scaring the leaves. Plants, like humans, need nutrition. The best fertilizer you can use is Happy Happy House Plant Plant Food. This is life changing. It comes in a cute bottle that you can keep on the counter and you water it outside as you use it over and over again. You will never forget to feed it because it is so consistent and it is an absolute miracle. The new growth is so much. Potting Your Snake Plant When it comes to snake plants, smaller pots are better. They grow quickly in a small pot because they like a crowded root system. Most plants will come in fairly thin black plastic pots. As the root systems become more developed, they can break and even break the plastic pot. If you need to remove the plastic pot from your plants without damaging the roots, take a pair of scissors and cut the pot away from the root system. Pruning Tips In some cases, you need to prune the snake plant. It grows too much and grows out of control and its leaves start to turn brown. In these cases, it is necessary to prune it regularly. Here are some tips for pruning: When you cut the Stalk, it will ooze a little and this goo is mildly poisonous, avoid eating it. Cut damaged or dropping leaves near the base of the plant. Don’t throw these cuttings away!! They can be propagated into new snake plants!  Comman Mistakes To Avoids You should avoid the following mistakes when growing snake plants at home: Also Read: Why Marigold Plant Can’t Grow At Home – Easy Guide To Grow Marigold Plant Final Thoughts Snake plants are one of the most resilient houseplants that are often neglected and neglected, ensuring that they not only survive but actually thrive and grow. The ultimate idea for their care is to mimic their native dry environment. Above, you have been told how to grow a snake plant in completely simple terms. You can easily follow them and grow a snake plant at home and enjoy this unique hobby that you will find quite enjoyable.By providing adequate water, light, and proper care, you can easily grow a snake plant indoors or outdoors.

How To Grow Hop Plants – Why Hop Plant Can’t Grow!

how to grow hop plants​

Yes, today I will tell you the easy way to how to grow hop plants​. When I started growing a hop plant at home, I started by providing it with adequate sunlight, adequate amount of soil, fertilizer, proper nutrition, and proper care and attention. And in return, I got a very good, healthy and strong hop plant. Hop plants are actually considered low-maintenance and low-maintenance plants. When I grew your plant at home, I had to give it very little care and attention. That’s why they are initially very friendly to grow indoors. When you get their basic care right and provide them with the right light, adequate water, well-drained soil, and the right type of fertilizer at the right time, and with a little attention to temperature and humidity, you can enjoy a healthy, green, flowering plant that will help you enhance the beauty of your home to a great extent. Growing Hop Plants From Seed To grow a hop plant at home, it is very important to choose a healthy and strong seed. One of the important factors is the process. First of all, choose good seeds. This will have a great impact on the growth of your plant. Get seeds from a reliable supplier or get a labeled seed packet from a reliable nursery or a labeled seed packet.Always use good quality seeds. Good quality seeds improve the growth of your plants. Always buy seeds from a reliable supplier or nursery and check the company label on the seed packet. Be wise when buying seeds. Buy seeds that are not damaged. Choose the Right Plant Variety Choosing a location plays an important role in the optimal growth of the hop plant, and location is very important for the optimal growth of the plant.Hop plants come in many varieties with different shapes, leaf sizes, and numbers of blooms. Some varieties grow in complex, bushy clumps, while others are beautiful in hanging baskets.When I grew a hop plant at home, I chose a home-grown variety, which proved to be very good for my plant and excellent for growth.When you grow a hop plant in your home, always choose the best and best variety that can be grown indoors so that you don’t have to face any problems. Select the Perfect Location Hop loves indirect light, meaning partial shade, and doesn’t grow well in too much direct sunlight, so avoid placing it near a south-facing window. Although a little direct sunlight is fine, it likes the soft morning and evening sun, which helps the leaves grow. If the leaves start to droop, become smaller, or the plant’s growth slows, it may need more light. If the leaves are looking very yellow, they may need less light. A little extra attention to your green friend will help it to spread out and flourish. Also Read: https://www.hopkinsmedicine.org/health/wellness-and-prevention/ginger-benefits Use Well-Draining Soil Peperomia Hop isn’t super picky about its soil. Choose a well-draining mix to prevent root rot and overwatering. We recommend mixing PLNTS potting soil with perlite and some organic matter like coconut fiber. This helps with air circulation around the roots and keeps the soil lightly moist. Peperomia isn’t too sensitive about soil pH but grows best with a pH of 6.0-7.5. Water Properly (Avoid Overwatering) Hop plants don’t need a lot of water and prefer to dry out a bit between waterings. Make sure the top two to three centimeters of soil is dry before watering again. This helps prevent rotting and root rot. Watering once a week is usually enough. Check the soil with your finger between waterings. If it’s dry, water it. If it’s still damp, wait a little longer and make sure there’s no water left in the pot. Hops go into a kind of hibernation in the winter, so they need less water right now. Maintain Ideal Temperature & Humidity Hop plants do not need very high or very low temperatures for optimal growth. They are always happy in moderate temperatures and grow best. They are usually happiest at normal room temperatures between 16 and 24. They do not like extreme temperatures that are too hot or too cold, so keep them away from drafts. Always avoid placing them near an open window or in a cold bedroom. As a forest plant, they enjoy high humidity. Place a small cup of water on your radiator and occasionally mist your plant with a spray bottle to treat your green friend. Misting your hop will help reduce dry air and prevent it from developing brown edges and spots or curled leaves. It also helps to keep dust out and fight insects. In addition, regular misting sessions are very helpful in making the plant look shiny and is a very important process for hops. Here is how it has worked for me all along.Always avoid placing the plant in too much sun or too much shade and never place the plant near a shady building where it will experience any obstruction to light. Always place it in the right amount of light where its growth is optimal.Always avoid direct sunlight as it causes the leaves of the plants to burn. Fertilizing for Healthy Growth Fertilizing your grow-up plant at home plays an important role in keeping your plant healthy and strong. Fertilizing is important, so it should be done properly. During the summer months, apply a balanced amount every four to six weeks and thin it out until it is strong. Do not let too much fertilizer accumulate. This can cause the plant to turn yellow and face many problems, and the growth of your plant may also slow down. Always provide the right amount of fertilizer at the right time and mix it well so that the plant gets the nutrients it needs to bloom and does not hinder its growth. Pruning & Repotting If you are growing a poppy plant at home, timely pruning is one of the important factors. When I grew my poppy plant at … Read more

Why Marigold Plant Can’t Grow At Home – Easy Guide To Grow Marigold Plant

Why Marigold Plant Can't Grow At Home

Marigold has always held a special place in my eyes, not only because of their vibrant yellow color, but also because of their flexible, resilient properties.They grow in spring and autumn, and in autumn they look even more beautiful and pleasing to the eye.Growing a MariGold plant in your garden is a very easy and straightforward process, and it will grow in about eight weeks and will fill your garden with beauty.The MariGold plant is a charming and eye-catching plant.And this plant is also great for your vegetable gardens because it also prevents pests from attacking. In this article, I will tell you the complete method of growing Marigold plants, how you can grow it inside your home and enjoy its beautiful view. Why You Grow Marigold Plant You might be wondering why the MariGold is such a popular plant among gardeners. It is so popular because it is so attractive and pleasing to the eye, and it is very easy to grow. It is great in your vegetable garden because it keeps pests away and it is known for its beauty and beautiful colors. Ever since I have grown the MariGold plant in my garden, it has also reduced the number of pests in my garden. Sometimes I forget to water it or I am not able to take good care of it, but then this plant has been growing very well in my garden. Also Read: Rose flower Growing Marigolds in Containers If you have limited space in your home or you want to plant flowers in your yard, you can grow it in a small pot and it grows very well in a pot too. Below are some points that you can follow to grow your MariGold plant in your pot: The MariGold plant not only beautifies your home but also provides the flexibility to move your pots around. Types of Marigolds Now that we have decided to grow the MariGold plant at home, let’s talk about which varieties are best for growing at home. Each variety has its own characteristics. We will discuss some varieties here: Dwarf Marigolds This is a special type of marigold that is found in complex varieties that are best suited for container gardens and indoor pots. They require minimal space and are continuously blooming with proper care. They require very little maintenance to grow well. African Marigolds (Tagetes erecta) This variety of MariGold always grows in groups and its plants are about three feet tall and its flowers are large and yellow in color and beautiful and it likes dry temperatures and needs full sun to thrive. French Marigolds (Tagetes patula) French MariGold is more complex than the African variety. This variety usually has flowers that are 12 inches long and is bushy. Its flowers are small and range in color from yellow to deep red. French Marie Gold is very popular for its long blooms that can last well into the Autumn season. Signet Marigolds (Tagetes tenuifolia) Signet marigolds are slightly different in appearance and have attractive flowers that have a lemony scent and a mild lemon flavor. These marigolds are often used in salads because of their small, edible petals, which add spicy and citrus flavor. When to Plant Marigolds Good timing is everything when growing MariGold from seed: Spring Planting Marigold plants mostly bloom in late spring and should be planted in late spring. These flowers bloom in summer, so you can plant them in late winter, or if you live in a very warm area, you can plant them in early March, so you can enjoy the flowers of these plants in summer.You can start planting and sowing seeds of marigold in your home about four to six weeks before the frosts set in. This gives your plants a head start and allows you to enjoy their flowers early in the summer season. Summer and Fall Planting Planting MariGold seedlings in late summer and early autumn is also a great option and it also grows very well at this time, depending on your climate, but it depends a lot on your temperature and climate because at this time the soil is warm and the temperature is cool, which is ideal for growing MariGold and at this time the MariGold plant grows very well. Where to Plant Marigolds Choosing the right location for your MariGold plant also helps the plant grow and thrive. These flowers love the sun, so they should get about six to seven hours of sunlight per day.MariGold plants can tolerate shade but cannot tolerate direct, full sunlight.Good soil is also essential for the growth of MariGold plants because they grow best in good soil. If your garden has heavy or sandy soil, amend it by adding a little fertilizer because MariGold plants do not grow in heavy soil. We mostly plant MariGold along the sides of our gardens. Here are some ideas on where you can plant them: Step-by-Step Guide: How To Grow a Marigold Successfully Select High-Quality Seeds or Seedlings Choosing the right seed for growing a MariGold plant is very important because a healthy and correct seed helps the plant grow healthy and well.Avoid broken seeds and you can also get seeds from an online supplier or nursery. Make sure the seeds are fresh because fresh seeds produce good plants and the best growth. Prepare Well-Draining Soil Use soft soil to grow the MariGold plant. Avoid hard soil because the MariGold plant dislikes hard soil and does not grow in it.If the soil is hard, soften it and then sow the seeds of the Mari Gold plant in it. Soft soil helps the plant grow quickly and healthily. Also Read: How To Grow Cashew Plants at Home – Easy Step-by-Step Guide for Fast Growth & Big Harvest Plant Seeds at the Correct Depth Many people make the mistake of planting seeds in the soil. They either plant the seeds too low or too high, which can make it difficult for their … Read more

When I Grow Cashew Plant At Home – I See Shocking Result!

When i grow cashew plant at home

The cashew nut is a perennial plant native to northeastern Brazil and southeastern Venezuela in South America, but now it is also grown in many other warm regions such as Asia, India, Africa, and the Southeast. It is a very popular and well-known plant because cashew nuts are a popular item during the winter. Cashew nuts are a popular fruit and are commonly used in jams and jellies, but are more popular in the winter because they are a warming dry fruit. I have also grown a cashew tree in my house and it has grown very well in my house and also bears fruit. Today I will tell you how you can also grow a cashew tree in your house like I have grown in my house. In today’s article, I will tell you the complete method of growing cashew trees, which I have applied and grown cashews at my home. Personal Pro Tips When I grew the cashew plant inside my house, that plant stopped growing inside my house. I just followed the steps that I have told you and my cashew plant has grown very well and very quickly inside the house and I have told you all my personal tips on how you can grow a cashew plant inside your house.I have kept my cashew plant in a good location with light water, good sunlight and has made my cashew plant grow perfectly indoors. How I Grow Cashew Plants (Complete Guide) I have grown a cashew tree very quickly and very well inside my house, and to grow it, I have taken care of some things, which will make it grow very well in my house. Today, we will talk about the same points that I have applied to my tree, which has made my tree grow very quickly and very well at home. I have avoided giving it too much water and I have given it enough water that the soil is moist, and I have also taken care of its lighting, and I have also taken care of it well, and I have also taken care of its food, which has made the cashew tree grow in my house. Also Read: Cactus Key Takeaways There are many major tips for growing cashew plants indoors or outdoors. If you follow these major tips, you can easily grow a beautiful and hearty cashew plant indoors or outdoors. The major tips are as follows: Kind of Cashew Plant Choosing the right variety also helps a lot in growing a cashew tree. If you do not choose the right variety, your cashew tree will not grow in your house. That is why choosing the right variety is very important. Below are the varieties that have been given to you, from which you can choose one according to your circumstances: Dwarf Cashew Varieties Dwarf varieties are a great choice for growing indoors as they are a bit smaller in size but they grow well indoors. They require less maintenance and less light, making them an ideal option for growing indoors.You can also grow them outdoors. Standard (Tall) Cashew Trees This is a traditional variety and can be a little difficult to grow indoors as it requires more care and more space than an outdoor variety. Its production may decrease due to less space at home. Hybrid & High-Yield Varieties This is a very good variety because this variety is specially developed for excellent fruit size, disease resistance and high yield. This variety is a unique variety for indoor growing. If I ever grow cashew trees in my house again, I will choose this variety. How To Grow Cashew Plants In Home To grow a plant anywhere inside or outside the house, you need proper care and space. Below you have been guided step by step about all the things that are very beneficial for growing plants inside and outside the house. Those steps are being followed. Select Fresh, Viable Cashew Seeds I have chosen a good seed to grow a cashew tree in my house because choosing a good seed helps the plant grow a lot. I chose a fresh and unblemished seed, which is a very good option. You too should try to choose fresh and unblemished seeds and avoid roasted or overcooked seeds. Prepare Well-Draining Sandy Soil I have also chosen the soil for growing cashew trees very carefully. Plants always grow in soil that is loose or light. Plants grow with difficulty in hard soil, which reduces their growth. Therefore, try to choose loose or light soil that is nutritious or mix a little sand in your normal soil, which makes it nutritious. Also Read: How To Plants Tulips – Easy Step-by-Step Guide to Grow Beautiful Tulip Flowers at Home Germinate Seeds Properly I soaked the seeds in water for 12 to 14 hours before sowing, which softened the seeds, and soft seeds germinate quickly. When I sowed the cashew seeds, the temperature was 150 degrees Fahrenheit, which is an ideal temperature. You too should soak the seeds in water for 12 to 14 hours before sowing. Provide Proper Sunlight Cashew plants need a lot of sunlight to thrive because this plant likes dry weather and sunlight, so it needs six to eight hours of sunlight every day. You can either place it in an open area where there is plenty of sunlight or you can also place it in a south-facing window. Watering Schedule for Young Plants The best way to water your cashew tree also helps a lot in growing it. So whenever you feel that the top two inches of soil on your cashew tree is dry, moisten the soil by giving it a little water. Cashew trees do not like excess water. Fertilizing for Strong Growth Cashew plants also need food to grow and thrive quickly, so you can give it a light dose of organic fertilizer mixed with water every three to four weeks, which will help your plant grow … Read more

Right Way To Grow Tulips Plant At Indoor – All Tulip Questions Will Be Clear!

Right Way To Grow Tulips Plant At Indoor

Right Way To Grow Tulips Plant At Indoor. Growing tulips seems quite difficult at home, but it is not that difficult. You can grow it inside your home. When I thought of planting it, I also thought that this plant grows very difficult indoors. But it looked so beautiful that I thought of growing it. I planted it inside my home and with a little care, proper light and proper water, it grew very quickly in my home and looks very beautiful in home. Is it possible to grow tulips at home? Yes, you can grow tulips at home. I have grown them indoors and they grow very quickly and well in my house. You just have to take care of their health, light and water, so that they can grow in your house too. This plant looks great in my house. Right Way To Grow Tulips Plant At Indoor (Personal Tips) If I may advise you, you must grow a tulip plant in your home because a tulip plant looks very beautiful when planted in the house and feels good to the heart and also enhances the beauty of the house and it is very easy to grow. You can grow it inside your home with proper care and you can place it anywhere in your house. Also Read: Cucumber What are the 5 points about tulip plant? Below are five points that you can use to grow tulip plants at home: What type of plant is a tulip? Choosing the right varieties for growing tulips indoors is very important. You should know which varieties will grow in your home and which ones will not. I will tell you about the tulips that I have grown in my home. Single Early Tulips I have also grown this variety indoors and it blooms in early spring and has cup-shaped flowers and is very beautiful and easy to grow indoors. Double Early Tulips This is also a very good type of tulip and it grows indoors with extra petals. It is an early blooming variety and it also looks very attractive and beautiful indoors. Triumph Tulips I choose this variety for my home because it is a very good variety and it produces large and colorful flowers that are strong and look very nice and attractive when grown indoors. Darwin Hybrid Tulips This is also a very good variety of tulips and it is very popular because of its long stems. They last from mid to late spring and have a long lifespan and they also present a charming view indoors. Also Read: How to Plant a Peach Seed – Easy Step-by-Step Guide to Grow a Peach Tree Dwarf Tulips (Species Tulips) This type of tulip plant is perfect for small spaces or containers because it requires very little space, so it can be grown indoors with minimal care and it also presents a charming and beautiful view. If you believe me, you can choose Triumph Tulips or Dwarf Tulips and Darwin Hybrid Tulips, it will be a very good choice. What month is the best month to plant tulips? I planted the tulip plant in September and November and it has grown very well so far and my friend also has the same opinion that you should plant it in September or November because they grow very well about three to four weeks before winter. Some varieties of tulips are planted even in the middle of winter, which grow well until the end of winter and present a beautiful and charming view in the house. How to plant a tulip step by step? I have shared the entire method with you below, the way I have grown the tulip plant in my home. How to choose good tulip bulbs? Choosing the right bulb for growing tulips is very important because a right bulb helps a lot in growing the right plant. Always use a bulb that is large and healthy because bulbs that are large in size and healthy produce big and good flowers. Avoid bulbs that are soft, dry or dead. Where is the best place to plant tulips? Choosing the right place to plant tulips is also very important. Tulips always thrive in a place that receives about six to eight hours of sunlight per day because they need sunlight and they grow very well in this place. Do tulip like well drained soil? Tulip plants always grow in soil that is well-drained. I planted the tulip plants in soft, loose soil, in which they grow very well. They need loose, soft soil to grow. Hard soil can hinder the growth of tulip plants. What depth should tulips be planted? To grow the plant, I planted the seed of it about six to seven inches deep in the soil because it needs to be planted that deep. If you plant it too high or too low, it can have trouble growing.If you agree with my opinion, you too should plant your tulips plant seeds six to seven inches deep in the soil. How much water should tulips need? When I planted the tulip plant, I lightly sprinkled the soil to moisten it because the tulip plant dislikes too much water, so I have never watered my tulip plant too much. You should also moisten its soil when it feels dry, but don’t overwater it either. What is the best fertiliser for tulips? I also fed my Tulip plant lightly because it is necessary to fertilize it, it keeps the plant healthy, but be careful to give it a little bit because if you fertilize it too much, your plant can rot. I used to give it a little fertilizer every three to four weeks, which made it grow very well and with beautiful flowers in my house. How to care for tulips in the spring? Take good care of your tulip plant and plant it in a location with balanced light, balanced water, and a good location, … Read more

How To Grow the Sunflower Plants – 7 Powerful Secrets to Grow Huge, Bright Sunflowers at Home

How To Grow the Sunflower Plants

Sunflower plants are mainly cultivated in European and Asian countries. Sunflowers are one of the country’s favorite flowers. They are very famous for their yellow color, although in addition to yellow, they can also be grown in green, red, and white. Everyone wants to grow sunflowers in their homes for their beauty, but many people get frustrated due to many difficulties. With a little effort and attention, you can easily grow a sunflower plant at home and enjoy its colorful and attractive flowers. We will give you a complete guide on how you can easily grow a sunflower plant in your home and enjoy its beauty. Key TakeAways How To Grow Sunflower Plants You can easily grow sunflowers indoors. To grow sunflowers, plant the seeds one to two inches deep in well-drained soil in the spring after the last frost, making sure they get six to eight hours of direct sunlight each day. Space the plants six to eight inches apart for short varieties and 30 inches apart for tall varieties. If you are growing sunflowers in pots, we recommend starting them in pots in March or early April. Fill a 3-inch pot or slightly larger with peat-free compost. Place one seed per pot in the compost, about a centimeter deep, and then cover with water. Also Read: The Versatile Fern Understanding Sunflower Basics Before Planting There are many basic steps to grow sunflower plants indoors and outdoors. If you understand these basic steps easily, you can easily enjoy a good harvest at home. There are some basics that are helpful in growing the plants, which are as follows: Types of Sunflowers (Choose the Right Variety) Choosing the right type of sunflower will be extremely helpful in growing and improving the growth of your sunflower plant, whether indoors or outdoors, as different varieties grow to different heights and serve different purposes. Here are the main types that you should consider. Below are all the types. Giant Sunflowers Giant Sunflowers This variety can grow to about 8 to 12 inches tall and can produce flower spikes. It is perfect for open areas in gardens where you want a dramatic look and this variety is very effective for growing outdoors in open gardens. Dwarf Sunflowers Dwarf sunflowers are a type of sunflower plant that grows from one to three feet tall and is ideal for containers, pots, and small gardens. They are easy to manage and are perfect for beginner gardeners to grow indoors. Multi-branched Sunflower plants Multi-branched plants are a type of sunflower. Instead of one large flower, they produce small fruits on each plant, making them perfect for continuous flowering and bouquets. This is a very attractive type of plant. Pollen-Free Sunflowers Pollen-free sunflowers are a type of sunflower that has been specially bred for indoor arrangements. These varieties do not leave behind pollen, keeping you clean and tidy, so they are considered a very useful variety to grow indoors. Colored or Decorative Varieties Colorful or ornamental varieties are considered a very good variety of sunflower plants because they come in shades of orange, bronze, or two-tone petals that add a unique beauty to your garden and are also very helpful in enhancing the beauty of your home. Best Time to Plant Sunflowers The best time to plant sunflowers is in the spring, usually April to May, once the danger of frost has passed and temperatures are at their lowest in May. For consistent play, you can plant them in two to three weeks until early summer. How Long Do Sunflowers Take to Grow? BBC Sunflowers generally take 80 to 120 days to grow from seed to maturity, about three to four months, although some fast-flowering varieties bloom in 55 to 70 days, and they usually sprout within seven to 14 days and reach full height in about three months. Also Read: How to Plant a Peach Seed – Easy Step-by-Step Guide to Grow a Peach Tree Step-by-Step Guide How To Grow the Sunflower Plants There are many steps to grow a sunflower plant indoors or outdoors. If you follow all of them, you can enjoy a good and beautiful harvest and reap the benefits. Those steps are explained below. Select High-Quality Seeds While buying seeds, keep the following things in mind: never use damaged or hybrid ones and buy seeds from a reliable supplier, and also buy them by confirming the labeling and expiration date so that you do not face any problem later and always use high-quality seeds. Prepare the Soil Properly For the best growth of sunflower plants, make sure to always choose good light and fertile soil that is rich in nutrients as sunflower plants thrive in rich nutrient soil and loosen the soil to a depth of 10 to 12 inches to remove any weeds, stones or debris stuck to the roots. This helps the plant grow quite quickly and helps the plant fill in quickly. Plant Seeds at the Correct Depth For the best growth of sunflower plants, planting them correctly is very important and plays an important role. For strong plants, it is important to plant them at the appropriate depth. Plant the plants about one inch to two and a half centimeters deep in the prepared soil. Planting them too deep can prevent them from growing. Plant the seeds six to 12 inches apart, depending on the appropriate variety and to allow them enough space to withstand the elements. Water Properly After Planting To ensure full growth of sunflower plants, the right amount of water must be provided at the right time. Be especially careful about the amount of water.During these early stages of growth and development, the soil should be kept moist but not waterlogged. Water sunflowers once established. Provide occasional weekly watering, about one inch per week, deep near the base. Ensure a strong, deep root system and water container plants more frequently in hot weather. This will be sufficient for the plant. Fertilize at the Right Time Timely … Read more

How to Plant a Peach Seed – Easy Step-by-Step Guide to Grow a Peach Tree

How to Plant a Peach Seed

Growing Peach seeds from seedbeds is a rewarding, multi-month project that requires patience because it involves simulating winter conditions to break the seed’s top layer, whereas you can plant the seeds directly in the ground. For a higher success rate, you should clean, dry, and refrigerate the seeds for eight to 12 weeks before planting. By mimicking the refrigerator and winter conditions, urad trees arrive in your yard with ripe urads. Fruit trees, such as apricots and plums, are ideal candidates for growing from seed. You only need a locally grown urad variety and the right planting holes. Proper seed preparation and planting techniques are critical to successful seed establishment, but with the right location and basic care, young urad plants will grow quickly. Everything you need to know about growing delicious urads from seed is here for you. Key Takeaways (Quick Answer Section) Also Read: Rose How To Plant A Peach Seed (Step-by-Step Guide for Beginners) Step 1 – Choose the Right Peach Seed Not all varieties of Peach grow well indoors, so choosing the right variety is important. Always use ripe Peach and fresh Peach. Avoid using old, dried, or spoiled Peach. If possible, choose Peach from local or organic sources, as some store-bought Peach are treated or hybrid varieties do not grow at all. Step 2 – Clean and Dry the Seed Properly Cleaning and drying the urad seeds is very important to prevent them from rotting.After eating the Peach, remove any remaining flesh from its surface. Even small pieces of pulp can rot and inhibit germination. You can gently rinse the urad under running water. If necessary, use a soft brush to clean it thoroughly.The shell should be allowed to dry before storing or installing them, usually in preparation for the cold stratification process. Step 3 – Crack the Peach Pit (Optional but Recommended) To sow the seeds of the Peach plant, gently open the hard outer shell of the urad pit to extract the seed from inside. This helps it to germinate quickly, always taking care not to damage the inner part.This is a recommended step to increase the rate when growing the urad tree. The actual seed looks like an almond from the inside. Step 4 – Cold Stratification (The Secret to Germination) Peach seedlings need a cool period to germinate, or they grow at room temperature. They need 3 to 6 weeks of warm temperatures to start. So, wrap your peach seeds in a damp paper towel and store them in the refrigerator for 6 to 10 weeks. Once you see a small root emerging, the seeds are ready to be planted. Lift them out and plant them one to two inches deep in the soil. Step 5 – Planting the Peach Seed To grow a Peach tree from seed, clean and dry the pits. Crack them open to remove the inner seeds and refrigerate in a baggie of damp paper towels for eight to 12 weeks. Plant them one to three inches deep in well-drained soil in full sun and provide consistent moisture. Fruiting is expected in over three years. Step 6 – Watering and Initial Care Providing too much water can cause the urad plant to wilt or reduce its growth, so avoid overwatering your urad plant. When the soil of the Peach plant feels dry, moisten it with a light watering and make sure that the pot in which the Peach plant is planted has holes for water flow. Step 7 – Provide Sunlight and Warmth For optimal growth, a pomegranate plant must receive at least six to eight hours of direct, unfiltered sunlight per day. A pomegranate tree is a sun worshipper and requires high-intensity light to increase fruit production and prevent disease. Step 8 – Transplanting the Seedling When your tree is a few days old and has strong leaves, it is ready to be transplanted outside into a larger pot. Harden it off by exposing it to harsh outdoor conditions for a week, then plant it in well-drained soil with plenty of sunlight so that its growth does not stop. Also Read: How to Grow Lavender Plants: Expert Tips for Gorgeous, Fragrant Blooms Indoors & Outdoors Best Soil and Pot for Growing Peach Trees Plant the urad grove in a container at least 18 to 24 inches wide and deep. Use a well-drained, slightly acidic soil (pH 6.0 to 6.5) mixed with a good quality potting soil mixed with light or compost. Plastic pots are easy to move, while ceramic provides stability and both should have good drainage holes to prevent root rot. How Long Does It Take for a Peach Seed to Grow? The Peach plant is a very slow growing plant, so it requires patience to grow it. Usually, it depends on the temperature and care.A Peach seed usually takes three to five years to grow into a tree that bears fruit, some trees take up to eight years. The seeds require a period of cool, moist soil of one to three months for germination, after which the seedlings are planted in well-drained soil in full sun. Can You Grow a Peach Tree Indoors? Now the question is whether Peach plants can be grown indoors. The answer is yes, you can grow urad trees indoors, but it requires specific care, especially choosing dwarf self-pollinating varieties like Bonans or Pixies, ensuring six to eight hours of direct sunlight and providing a dormant period, using well-drained soil in containers, and repotting after two to three years and hand-pruning the flowers. Common Mistakes to Avoid When Planting a Peach Seed Mistakes you need to avoid when growing peach plant: Pro Tips to Grow a Peach Tree Faster To grow a Peach plant, you need to use a cool surface and the pot should be broken with care to grow the plant. You need about six to eight hours of sunlight a day to plant quickly. You need to use a pot with good drainage holes. Regular pruning … Read more

How To Grow Lotus Plants Indoors: Easy Tips For Stunning Indoor Water Gardens

How To Grow Lotus Plants Indoors

You can grow yams indoors by choosing a dwarf variety, using clay soil, placing the tuber in a wide bowl-shaped container without drainage holes, and providing six to eight hours of bright sunlight or high-powered LED grow lights per day. Keep the water temperature between 75 and 87 Fahrenheit.Change the water regularly to prevent wilting and fertilize in the summer. Lotus can be grown in a variety of ways, from free-standing hairs in your fingers to a pond in your home garden or a large pond on your property.Keep lotus away from flowing plants or springs. How To Grow Lotus Plants Indoors Recreate a natural environment to grow a lotus plant at home. Even without a pond or small bowl, start by choosing these types of lotus that are good for container growing. Use a large, real pot with drainage holes. Fill the pot with soil or potting soil and expose the growing tip. Gently tilt the pot upwards and pour two to four inches of room-temperature water over the soil. Provide six to eight hours of direct sunlight for your plant to grow best.To grow a lotus plant indoors, the temperature should be between 70 and 90 Fahrenheit. Also Read: How Do I Grow An Onion Plants Indoors – Easy Step-by-Step Guide for Beginners (Fast Results!) Key Takeaways There are many major takeaways for growing a lotus plant indoors, by following which you can easily grow a beautiful plant. These are the key takeaways: Step-by-Step Guide How To Grow Lotus Plants Indoors There are many easy ways to grow a lotus plant indoors. If you follow these methods, you can easily enjoy a beautiful lotus plant indoors. They are all Are Given Below. Choose the Right Container Now the question is how to grow kohlrabi in a container. The answer is to choose a wide, shallow and watertight container with no drainage holes for growing the lotus plant because they need space to fill their tuberous roots horizontally. Ideal pots are 18 to 36 inches wide and 12 to 18 inches deep and often use a round plastic resin or glazed ceramic material to hold the water. Smaller varieties of bowl lotuses need a minimum of 10 to 12 inches wide. Prepare the Soil Properly Proper soil preparation for lotus plants requires a heavy, dense medium that anchors the plant and provides nutrients without being too watery. The ideal medium is heavy clay or specially formulated potting soil, as traditional potting media is too light and can degrade water quality. Planting Lotus Tubers Correctly In early spring, plant the lotuses horizontally with the growth tips pointing upwards in a shallow, non-perforated container filled with a heavy potting soil or potting mix. Submerge the tips in two to four inches of water and place in full sun for six to eight hours or more. Maintain a warm water temperature of 70 to 85 degrees for successful growth. Adding Water the Right Way Adding water to lotus plants, especially when growing in a container or bowl setup, requires a more careful approach that keeps the plant moist while it is still young without overwhelming the leaves. Lotus thrives in standing warm water, usually three to four inches above the ground initially, rising to six to 12 inches as the plant matures. Second, lotuses are water plants and if you are growing them in a pot or bowl, make sure you keep the water level about five centimeters above the soil, but do not let the leaves submerge. It is fine to use regular tap water. Providing Proper Light Lotus plants need six to eight hours of direct sunlight daily for optimal growth and especially to prevent weak-legged or spindly plants. The pot should be kept in shallow water, not deep, and away from acids. Also Read: How to Grow Lavender Plants: Expert Tips for Gorgeous, Fragrant Blooms Indoors & Outdoors Fertilizing at the Right Time Fertilize lawns during peak growth for best growth. Early spring for general growth and early summer for lawns to strengthen roots. Ideal conditions are calm, overcast days with temperatures between 50 and 85 Fahrenheit. Avoid heavy rain and midday heat.Always fertilize the soil, never in drought conditions.Always fertilize the soil, never in drought conditions. Ongoing Care & Maintenance Ongoing care for a lotus plant includes ensuring it receives as much sunlight as possible, maintaining a consistent water level, and regular fertilization during the growing season, as well as specific procedures for extreme cold. Lotus plants are vigorous sun-loving perennials that require at least six hours of direct sunlight per day to bloom. Water temperatures are preferably between 75 and 90 Fahrenheit. How Long Does It Take for Lotus to Bloom Indoors Now the question is how long does it usually take for a lotus plant to grow indoors, the answer is that a lotus grown indoors from seed usually takes three to four months to bloom. The flowers usually bloom from mid-summer to early fall. Although some may bloom in the first year, it is common for the plants to focus on establishing tubers, which will result in blooming the second year. They need more than six hours of direct sunlight per day, warm temperatures and temperatures between 75 and 85 degrees, and regular feeding is also required. Common Problems When Growing Lotus Indoors Many people face many mistakes while growing a lotus plant at home and they fall prey to many common mistakes and those same common mistakes cause their disappointment. Below are all the mistakes that are very important to avoid when growing a lotus plant at home. By avoiding the mistakes mentioned above, you can easily grow a beautiful lotus plant at home, which will greatly help in enhancing the beauty of your home. All it takes is a little care, hard work, and dedication. Also Read: Ziziphus mauritiana Common Mistakes to Avoid While growing a lotus plant at home, many people face many difficulties and make many mistakes, and then later … Read more